How to Use Garage Door Release?

Garage Door Release

How to Use Garage Door Release?

The garage door release is an essential feature for every homeowner, offering a reliable backup mechanism when your automatic opener fails. 

In situations such as a power outage or a malfunctioning opener, knowing how to use the garage door release becomes invaluable. It allows you to bypass the automatic system and manually operate the door, ensuring continuous access to your garage. 

Properly utilizing this feature can save you both time and stress, preventing potential security issues or the inconvenience of being locked out. 

This blog will walk you through the step-by-step process so you can effectively operate your garage door manually whenever the need arises.

Understanding the Garage Door Release Mechanism

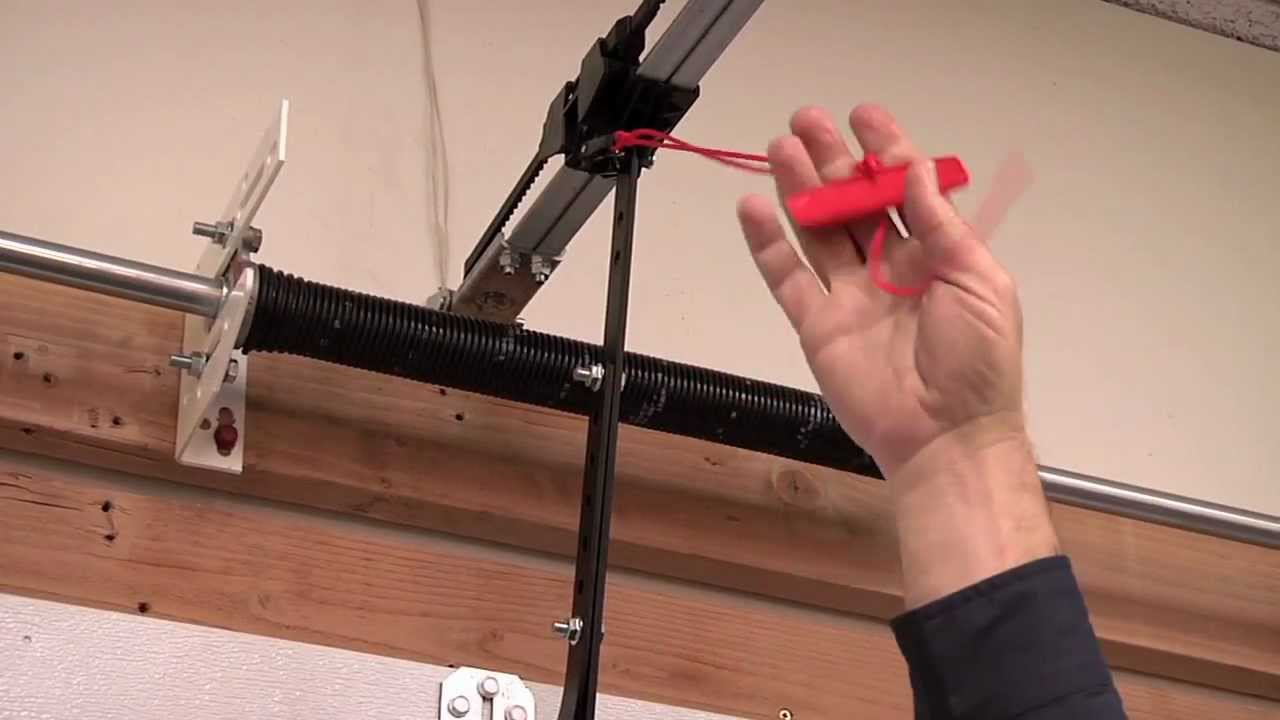
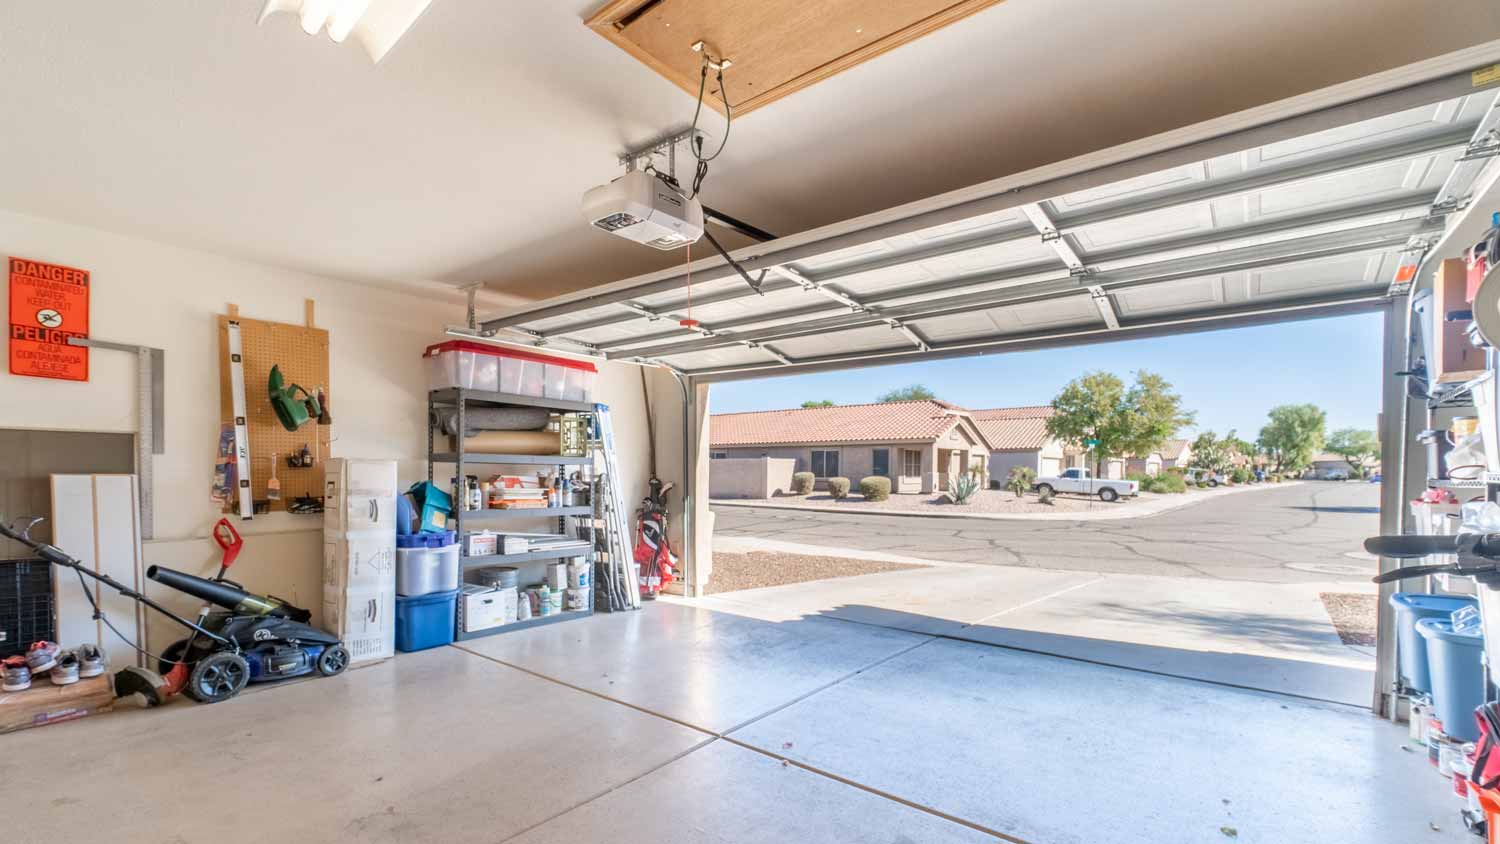
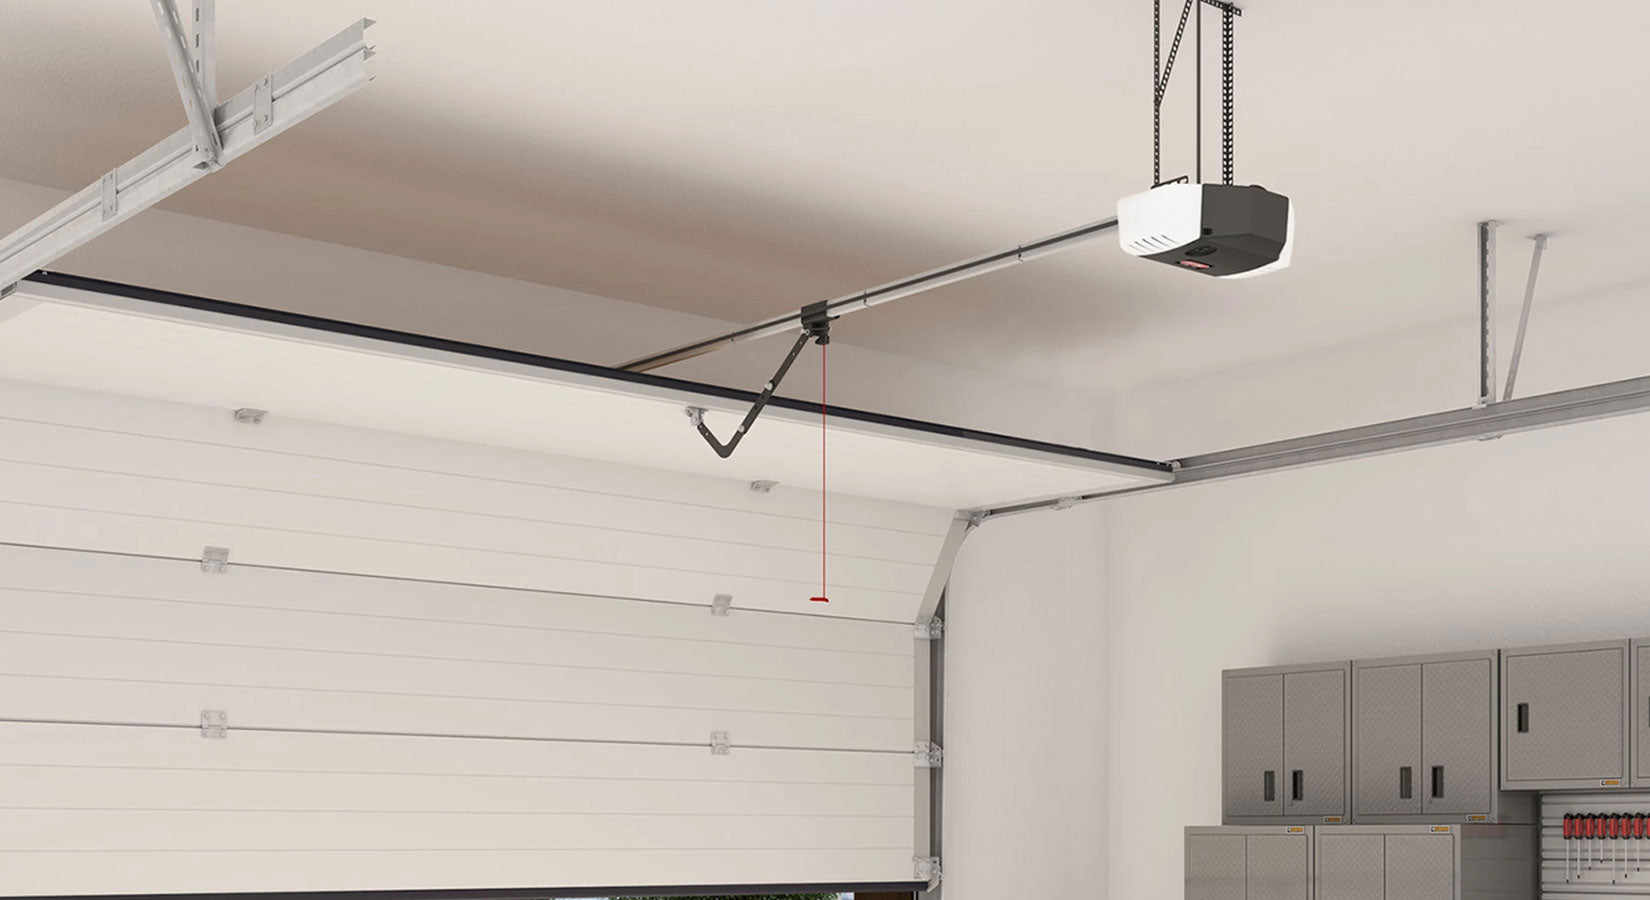
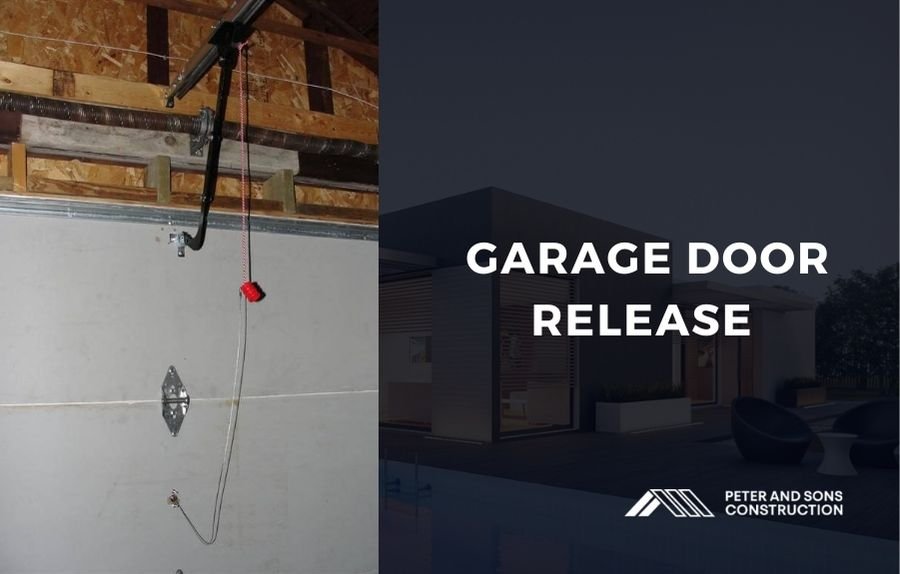
It is important to understand what the garage door release mechanism is and why it’s crucial. Typically, this mechanism consists of a cord with a red handle, which disengages the door from the opener, allowing you to open or close it manually. 

This is especially useful during power outages or if your garage door opener malfunctions.

Steps to Use the Garage Door Release

Step 1 - Ensure Safety First

Safety should always be your top priority. Before you start, make sure the garage door is fully closed. 

If the door is partially open, it could slam shut when the release is pulled, causing injury or damage.

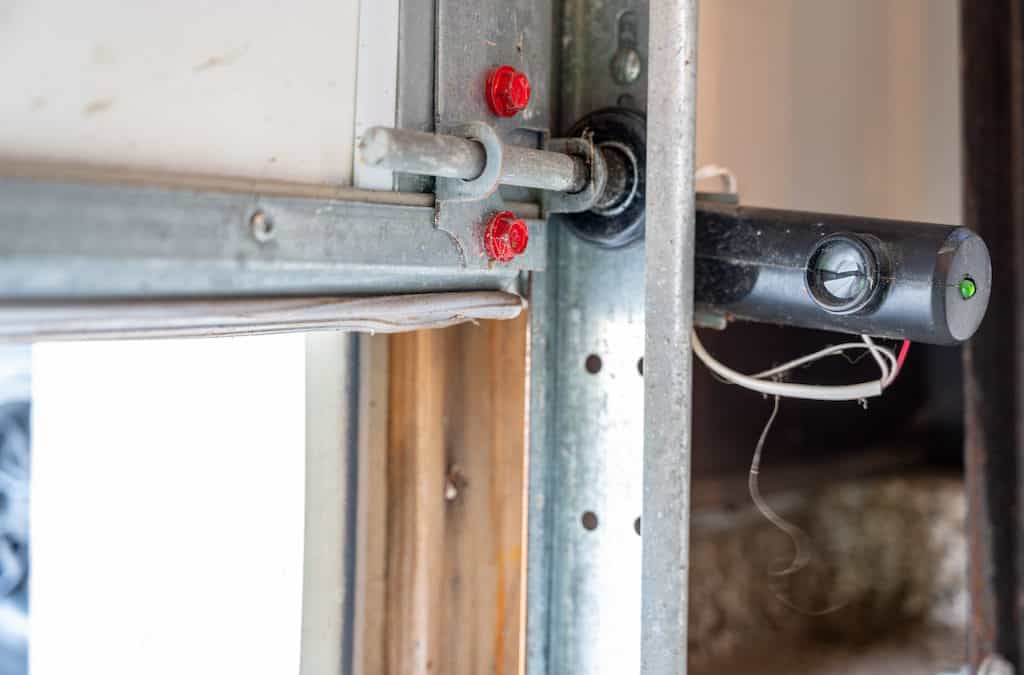
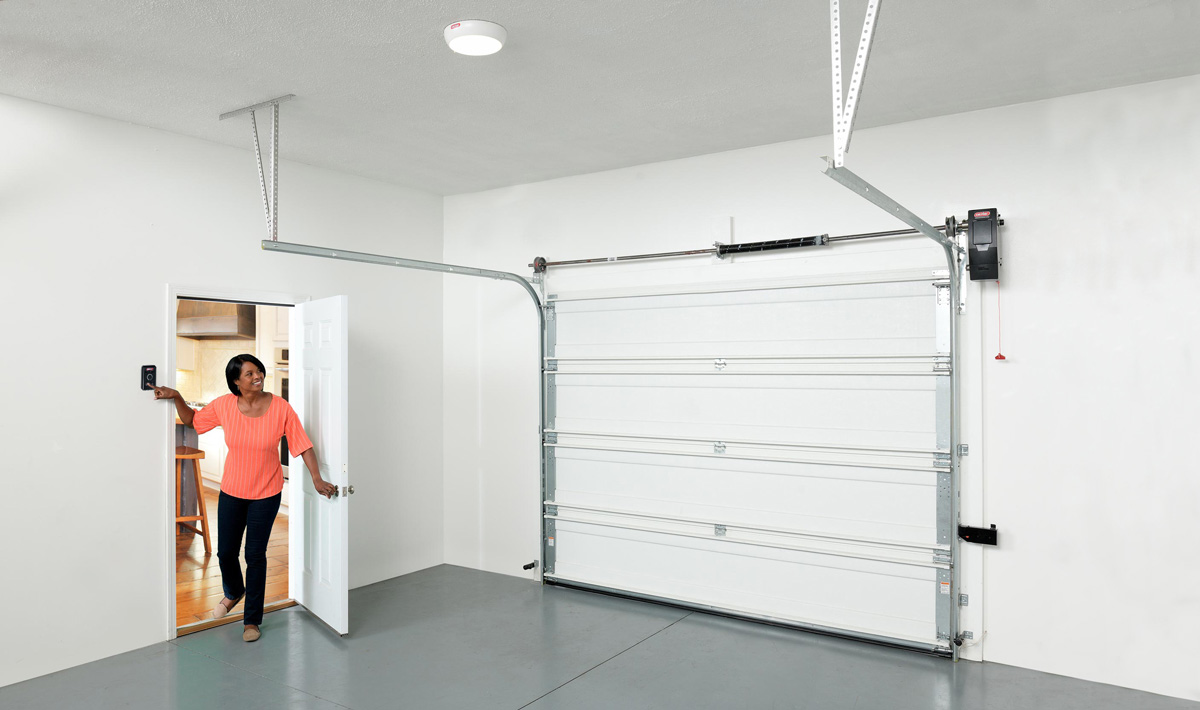
Step 2 - Locate the Emergency Release Cord

Inside your garage, look for a red cord hanging from the track of the garage door opener. This is the emergency release cord. 

It’s typically near the top of the garage door and connected to the trolley.

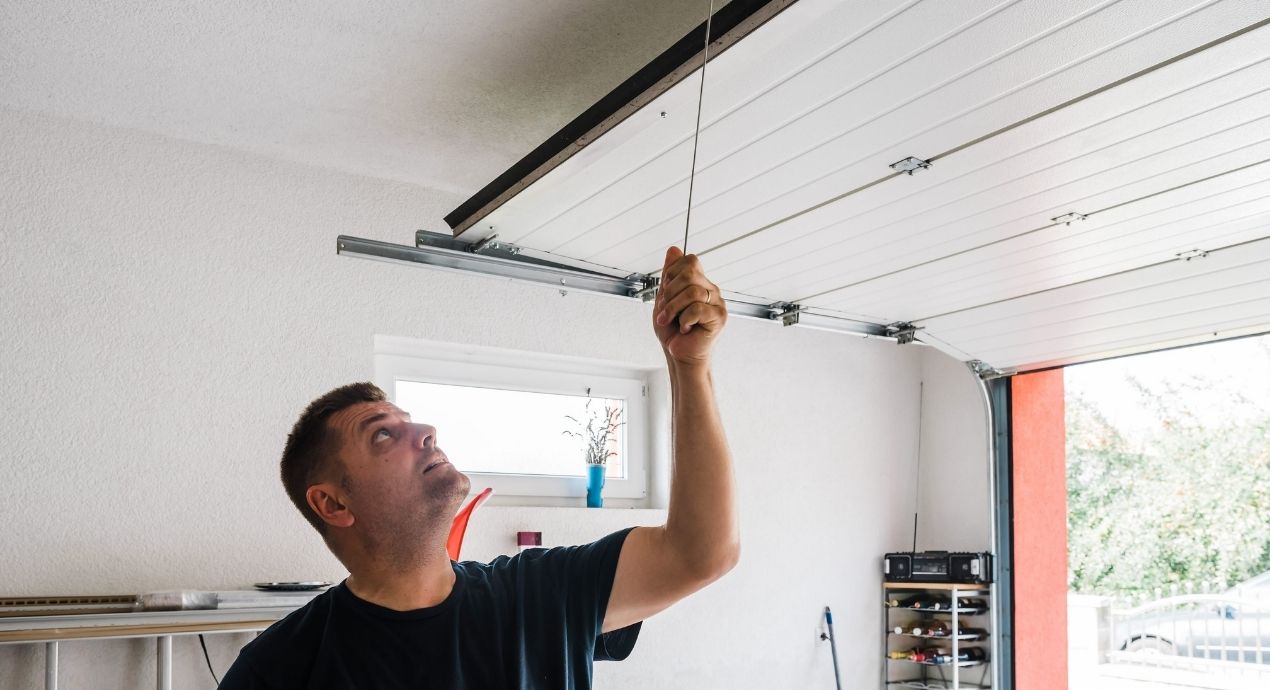
Step 3 - Pull the Emergency Release Cord

Firmly grasp the red handle and pull it down. This action disengages the trolley from the opener carriage, allowing you to operate the door manually. 

You’ll hear a click or a clunk sound when the mechanism releases.

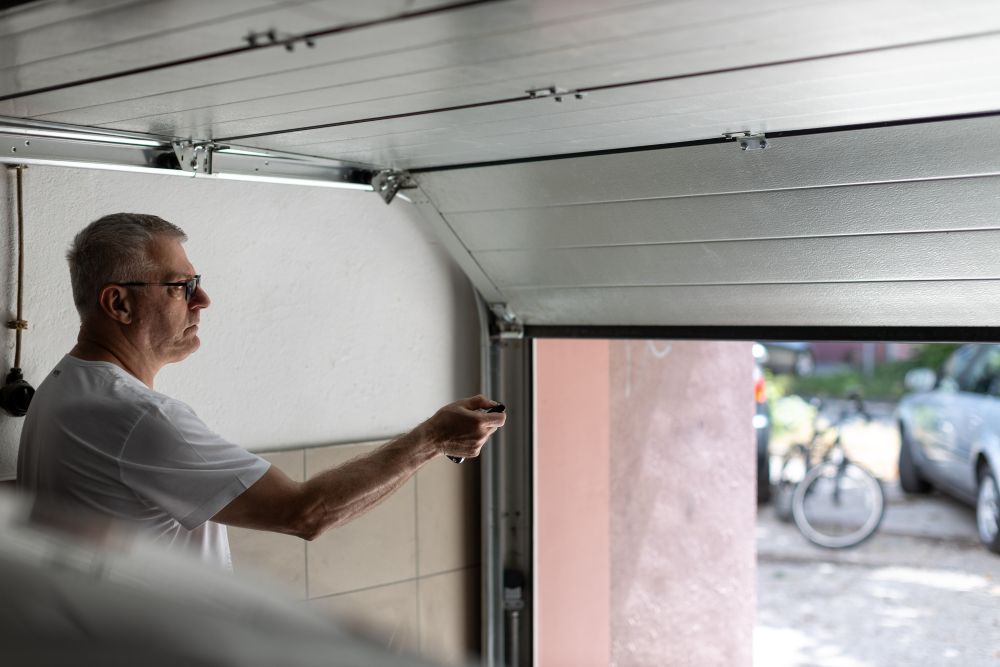
Step 4 - Manually Lift the Garage Door

Once the door is disengaged, you can lift it manually. Stand with your feet shoulder-width apart, grip the door firmly, and lift it using your legs to avoid straining your back. 

The door should move smoothly along the tracks. If it feels heavy or difficult to move, there may be an issue with the door springs or tracks.

Step 5 - Re-engage the Garage Door Opener

After you’ve manually opened or closed the door and you want to re-engage the automatic opener, pull the emergency release cord toward the door. 

This action will reattach the trolley to the opener carriage. Alternatively, you can also press the garage door opener button, which will cause the trolley to reconnect automatically when it moves.

Troubleshooting Common Issues

Even with a clear understanding of how to use the garage door release, you might encounter some common issues. Here are a few tips to troubleshoot them:

The Door Won't Open Manually

If the door is difficult to open manually, it could be due to a broken spring or an obstruction in the track. Inspect the springs and tracks for any visible issues.

The Release Cord is Missing or Damaged

If the emergency release cord is missing or damaged, you’ll need to replace it. Most home improvement stores carry these cords, and they’re relatively easy to install.

Re-engaging the Opener Fails

If the opener doesn’t re-engage, make sure the cord was pulled correctly toward the door. If it still doesn’t work, you might need to reset the opener or check for any mechanical issues.

When to Call a Professional

While knowing how to use garage door release is helpful, there are times when it’s best to call a professional. 

If your garage door doesn’t move smoothly, makes strange noises, or the release mechanism doesn’t function properly, a professional technician can diagnose and fix the problem. 

Regular maintenance by a professional can also prevent many of these issues, ensuring your garage door operates smoothly and safely.

Keeping Your Garage Door Functional and Reliable

Understanding how to use garage door release is essential for any homeowner. It provides peace of mind, knowing you can manually operate your garage door during an emergency. 

However, if you encounter any issues or need professional maintenance, don’t hesitate to contact experts like Peter and Sons. 

Their team is skilled in handling all types of garage door problems, ensuring your door remains in top condition. 

When you follow these simple steps, you can safely and effectively use your garage door release, keeping your home secure and functional even during unexpected power outages or technical issues.

You might like these

How to Reset Emergency Garage Door Release?

Emergency Garage Door Release

How to Reset Emergency Garage Door Release?

If you’ve ever had to use your garage door’s emergency release, you know how handy it can be. But after the emergency is over, it’s essential to reset it properly. 

Knowing how to reset the emergency garage door release ensures that your door operates smoothly and safely. 

Here’s a straightforward blog to help you with the process.

Understanding the Emergency Release

First, it’s helpful to understand what the emergency release is and why it’s there. The emergency release is a safety feature on most garage doors. 

It allows you to open or close the door manually if the automatic opener isn’t working. This can be a lifesaver during power outages or if the opener malfunctions. 

However, once you’ve used this feature, you’ll need to reset it to return the door to normal operation.

Step-by-Step Guide on How to Reset Emergency Garage Door Release

Ensure Safety First

Before you start, make sure the garage door is closed. This will prevent any accidents or injuries while you’re working on the door. 

If the door is open, close it manually by pulling the emergency release cord downward.

Locate the Emergency Release Cord

The emergency release cord is usually red and hangs from the garage door opener rail. This cord is what you pull to disconnect the door from the opener.

Re-Engage the Opener

To reset the emergency garage door release, you’ll need to re-engage the door with the automatic opener. There are a few methods to do this, depending on your specific garage door model:

  • Method 1: Pull the emergency release cord towards the door. This action should re-engage the door with the opener. You might hear a click, indicating that the connection has been restored.
  • Method 2: If pulling the cord doesn’t work, try running the garage door opener. Press the button on your remote or wall control to operate the door. The opener should connect to the door automatically.

Test the Door

Once you’ve re-engaged the opener, test the door to make sure it’s working correctly. Use the remote or wall control to open and close the door a few times. 

It should move smoothly without any hiccups.

Check the Manual Release Handle

Make sure the manual release handle is back in its original position. If it’s not, adjust it accordingly. The handle should be vertical, aligned with the opener rail.

Troubleshooting Tips

Check the Tracks

Ensure the garage door tracks are clear of any debris or obstructions. Sometimes dirt or objects can block the door’s path.

Inspect the Springs

The springs should be intact and not overly worn. If they look damaged, consider calling a professional for a repair.

Lubricate Moving Parts

A little lubrication on the hinges, rollers, and tracks can go a long way. This helps the door operate more smoothly.

When to Call a Professional

Sometimes, despite your best efforts, you might not be able to reset the emergency garage door release on your own. 

If you’re facing any of the following issues, it might be time to call a professional:

  • The door isn’t moving at all.
  • The door is making unusual noises.
  • The door is off its tracks.
  • You notice significant wear or damage to any parts.

Ensuring Your Garage Door Operates Smoothly

Learning how to reset the emergency garage door release is a useful skill that can save you time and hassle. Following these steps ensures your garage door is back to normal operation quickly. 

However, if you encounter any issues or feel unsure about the process, don’t hesitate to reach out to the experts.

At Peter and Sons Construction, they specialize in garage door repairs and maintenance. Their team is here to help with any problems you might face, ensuring your garage door works smoothly and safely.

Don’t let a stuck garage door ruin your day—give them a call for professional, reliable service.

You might like these

5 Signs Your Commercial Garage Door Weather Stripping Needs Replacement

commercial-garage-door-weather-stripping

5 Signs Your Commercial Garage Door Weather Stripping Needs Replacement

Your commercial garage door is essential in safeguarding your business from the elements. One critical component that is often neglected is the weather stripping

While it may seem inconsequential, weather stripping is vital for maintaining the integrity of your garage door’s seal. 

Here are five signs indicating that your commercial garage door weather stripping requires replacement.

1. Visible Cracks and Gaps

The most obvious sign that your weather stripping needs replacing is visible cracks and gaps. Over time, weather stripping can become brittle and start to crack. 

When this happens, it loses its ability to seal properly. If you notice any gaps or cracks, it’s time to replace the weather stripping.

Visible gaps can lead to energy loss as warm or cool air escapes, making your HVAC system work harder. 

This not only increases your energy bills but also reduces the comfort level inside your building.

2. Water Leaks

If you see water pooling inside your garage after it rains, your weather stripping might be to blame. Good weather stripping should keep water out. 

When it starts to fail, water can seep in, causing damage to your floor and anything stored in the garage. If you notice water leaks, inspect the weather stripping along the bottom of the door. If it’s worn or damaged, it’s time for a replacement.

Water damage can lead to mold and mildew, which are health hazards and can damage the structure of your building. Addressing this issue promptly can save you from costly repairs down the line.

3. Drafts

Drafts are a clear sign that your commercial garage door weather stripping is not doing its job. If you feel cold air coming through the bottom or sides of the door, the weather stripping is likely worn out. This can make it difficult to maintain a consistent temperature inside your garage, impacting both comfort and energy efficiency.

Drafts can also bring in dust, dirt, and pests, making your garage less clean and secure. Replacing the weather stripping will help seal out drafts and keep your garage well-insulated.

4. Increased Energy Bills

A sudden spike in your energy bills can be a sign that your weather stripping is no longer effective. When the weather stripping fails, it allows outside air to enter and conditioned air to escape. 

This forces your heating and cooling systems to work harder, increasing your energy consumption.

If you’ve noticed an increase in your energy bills without any other explanation, it might be time to check the weather stripping on your commercial garage door. 

Replacing it can help improve energy efficiency and reduce costs.

5. Difficulty Opening or Closing the Door

If your commercial garage door is harder to open or close, worn-out weather stripping could be the cause. When the weather stripping becomes old and brittle, it can create friction that makes the door stick. 

This not only affects the operation of the door but can also put extra strain on the opener.

Regularly check the weather stripping and ensure it’s in good condition. 

Replacing it when needed can keep your door operating smoothly and prevent wear and tear on the opener.

Time for a Weather Stripping Check-Up

Keeping an eye on your commercial garage door weather stripping is essential for maintaining a comfortable and efficient workspace. If you notice any of these signs, it’s time to replace the weather stripping to avoid further damage and expenses.

For professional help, Peter and Sons offer reliable services to ensure your commercial garage door is in top shape. 

Visit Peter and Sons for more information on how they can assist you with your garage door needs.

You might like these

How Wide and Tall is a Commercial Garage Door?

How Wide and Tall is a Commercial Garage Door?

How Wide and Tall is a Commercial Garage Door?

When planning for a new commercial building, one of the essential aspects to consider is the size of the garage doors. 

Getting the right size is crucial for ensuring that your business operations run smoothly, whether you’re accommodating large delivery trucks, heavy machinery, or multiple vehicles.

Standard Dimensions of Commercial Garage Doors

Commercial garage doors come in a variety of sizes to suit different needs. The most common widths for these doors range from 12 to 24 feet. In terms of height, you’ll typically see doors that are 12 to 16 feet tall. 

These dimensions cater to a wide range of commercial vehicles and equipment, ensuring easy access and efficient operations.

However, the question, “how wide and tall is a commercial garage door?” doesn’t have a one-size-fits-all answer. 

The required dimensions can vary significantly based on the specific needs of the business. For example, a warehouse handling large shipments will need larger doors compared to a smaller commercial establishment like an auto repair shop.

Custom Sizes for Unique Requirements

In many cases, standard sizes may not meet the specific needs of your business. Custom garage doors are often the best solution for such scenarios. 

When you opt for a custom size, you can ensure that the door fits perfectly with your facility’s requirements. For instance, if you operate a business that involves oversized vehicles or equipment, a custom door can be designed to accommodate those dimensions.

Learning how wide and tall a commercial garage door should be for your specific situation involves assessing your operational needs. 

This might include considering the height of the largest vehicle entering your facility or the amount of clearance needed for safe and efficient movement.

Material and Insulation Considerations

The size of a commercial garage door is not the only factor to consider. The material and insulation of the door are also important. Steel and aluminum are popular choices due to their durability and strength. 

Insulated doors are particularly beneficial in climates with extreme temperatures, as they help maintain a stable indoor environment and reduce energy costs.

Choosing the right material and insulation also impacts the door’s overall size and weight, which in turn affects the type of opener and hardware needed. 

When figuring out how wide and tall a commercial garage door should be, it’s essential to consider these aspects to ensure a smooth and safe operation.

Installation and Maintenance

Proper installation is key to ensuring that your commercial garage door operates efficiently and safely. Working with experienced professionals can help you avoid common pitfalls and ensure that your door is correctly installed and balanced. 

Regular maintenance is also crucial to keep the door in good working condition and to extend its lifespan.

When thinking about how wide and tall a commercial garage door should be, don’t forget the importance of regular checks and servicing. 

This includes lubricating moving parts, checking for wear and tear, and ensuring that safety features are functioning correctly.

The Perfect Size for Your Commercial Garage Door

So, how wide and tall is a commercial garage door? The answer depends on your specific needs and the nature of your business. Standard sizes are available, but custom solutions offer the flexibility to meet unique requirements. 

When you consider factors such as the types of vehicles and equipment that will use the door, the material and insulation needs, and the importance of professional installation and regular maintenance, you can make an informed decision.

For businesses needing expert advice and reliable products, companies like Peter and Sons offer a wide range of commercial garage doors tailored to meet various needs. 

Whether you go for a standard size or a custom design, ensuring that your commercial garage door fits your specific requirements is key to smooth operations and long-term satisfaction.

You might like these

How to Install a Treadle Gummed Hose Switch for a Commercial Garage Door

How to Install a Treadle Gummed Hose Switch for a Commercial Garage Door

How to a Treadle Gummed Hose Switch for a Commercial Garage Door ?

Installing a treadle gummed hose switch for a commercial garage door may initially appear challenging, but with the appropriate guidance, it becomes quite manageable. 

This switch is crucial for ensuring the smooth and safe operation of your commercial garage door. 

In this blog, we will guide you through the step-by-step process of installing a treadle gummed hose switch.

What Is a Treadle Gummed Hose Switch?

Before we proceed with the installation process, it is important to understand the function and significance of a treadle gummed hose switch. This switch is commonly used in commercial environments where large doors frequently need to open and close. 

The switch consists of a hose placed on the ground, which, when stepped on, activates the mechanism to open or close the door. This setup is particularly useful in settings that require hands-free operation, such as busy garages and warehouses.

Tools and Materials Needed

Before starting the installation, gather the following tools and materials:

  • Treadle gummed hose switch kit
  • Drill with bits
  • Screwdrivers
  • Mounting brackets
  • Screws and anchors
  • Electrical tape
  • Wire connectors
  • Measuring tape
  • Pencil or marker

Step-by-Step Installation Guide

1. Prepare the Area

First, ensure that the area where you plan to install the switch is clean and free of debris. 

This will make the installation process smoother and prevent any potential issues with the switch’s operation.

2. Measure and Mark the Placement

Using a measuring tape, determine the best location for the hose. It should be positioned in a spot where it can be easily stepped on to activate the switch. 

Once you’ve found the ideal location, use a pencil or marker to mark the placement of the hose and switch.

3. Install the Hose

Lay the hose on the ground along the marked placement. Ensure it is straight and free of kinks, as any bends or twists can affect its operation. 

Once positioned correctly, secure the hose to the ground using the provided mounting brackets and screws. Make sure the hose is firmly in place but not overly tight, as this could damage it.

4. Mount the Switch

Next, mount the switch unit near the hose. The exact location may vary depending on the design of your commercial garage door and the switch kit. 

Typically, the switch should be mounted on the wall or a nearby sturdy surface. Use the drill to make pilot holes, then attach the switch using screws and anchors.

5. Connect the Wiring

With the switch securely mounted, it’s time to connect the wiring. This step is crucial and should be done with care to ensure safe and effective operation. Follow the instructions provided with your switch kit for wiring details. 

Generally, you will need to connect the switch to the door opener’s control unit. Use wire connectors to secure the connections and wrap them with electrical tape for added safety.

6. Test the Switch

Once all connections are made, it’s time to test the switch. Step on the hose to activate the switch and observe the door’s response. 

The door should open or close smoothly without any delays or issues. If the door does not respond correctly, double-check the wiring and ensure all connections are secure.

7. Final Adjustments

If necessary, make any final adjustments to the hose and switch placement. This may involve repositioning the hose slightly or tightening the mounting brackets. 

The goal is to ensure that the switch operates reliably every time the hose is stepped on.

Tips for Maintenance

To keep your treadle gummed hose switch in good working condition, regular maintenance is key. Here are some simple tips:

Regular Cleaning

Keep the area around the hose and switch clean and free of debris. Dirt and grime can interfere with the switch’s operation.

Inspect the Hose

Periodically check the hose for any signs of wear or damage. Replace it if necessary to prevent malfunction.

Check Connections

Ensure that all wiring connections remain secure and free from corrosion. Loose or damaged wires can cause operational issues.

Enhancing Efficiency and Safety with a Treadle Gummed Hose Switch

Installing a treadle gummed hose switch for a commercial garage door is a straightforward process that significantly enhances the functionality and safety of your facility. 

When you carefully follow these steps, you can ensure a smooth and efficient installation. For high-quality garage door solutions and professional assistance, consider reaching out to Peter and Sons. 

They provide a comprehensive range of products and services to meet all your commercial garage door needs.

For more information about their services, visit their website.

You might like these

How to Wire Photo Eyes to Commercial Garage Door?

How to Wire Photo Eyes to Commercial Garage Door?

How to Wire Photo Eyes to Commercial Garage Door?

If you’re dealing with a commercial garage door, one essential safety feature is the photo eye sensor. 

These sensors prevent the door from closing if there’s something in its path, which can prevent accidents and damage. 

In this blog, we’ll walk you through how to wire photo eyes to a commercial garage door. 

This process is not too complicated, but it’s crucial to get it right for the safety of everyone who uses the door.

What You'll Need

Before you start wiring the photo eyes, gather these tools and materials:

Step-by-Step Guide

1. Prepare the Area

Ensure the garage door opener is unplugged to avoid any electrical mishaps. Safety first! Clear the area where you’ll be working and make sure you have adequate lighting.

2. Position the Photo Eyes

Photo eyes need to be installed on either side of the garage door, about 6 inches above the ground. 

Use your measuring tape to ensure they are at the same height. This alignment is crucial for the sensors to work correctly.

3. Mount the Sensors

Most photo eye sensors come with brackets. Attach these brackets to the walls or the tracks of your garage door using the provided screws. 

Make sure the sensors are facing each other directly. This is important as any misalignment can cause the sensors to malfunction.

4. Run the Wires

Now, you need to connect the photo eyes to the garage door opener. Start by running the wires from the sensors to the opener. 

If your garage has pre-existing wiring channels or conduits, use them for a neater installation.

5. Connect the Wires

Using your wire strippers, remove about half an inch of insulation from the ends of the wires. Typically, you’ll have two wires: one for power and one for signal. 

Connect these wires to the corresponding terminals on the garage door opener. Most openers will have clearly marked terminals for the photo eyes.

6. Secure the Wires

Once the wires are connected, use wire nuts to secure the connections. Wrap these with electrical tape to ensure they stay in place and are insulated. 

Tidy up any loose wires using cable ties or clips, keeping them away from any moving parts of the garage door.

7. Align the Sensors

With the sensors mounted and wired, plug in the garage door opener. The sensors typically have indicator lights. 

If they are aligned correctly, the lights should be steady. If they blink or are off, you might need to adjust the position slightly until the alignment is perfect.

8. Test the System

Close the garage door using the opener. Then, wave an object in front of the photo eyes to test if the door stops and reverses. 

This test ensures the sensors are functioning correctly. Repeat the test a few times to be sure.

9. Final Adjustments

If everything works correctly, tighten all the screws and double-check the wire connections. Make sure the sensors are secure and the wires are neatly fastened.

Troubleshooting Tips

Lights Not Working

If the indicator lights on the sensors are not lit, check the power connections. Make sure the wires are properly connected and not damaged.

Misalignment

If the door does not reverse when an object is placed in front of the sensors, recheck the alignment. The sensors must face each other directly without any obstruction.

Intermittent Issues

If the sensors work inconsistently, there might be loose wires or the sensors could be dirty. Clean the sensors with a soft cloth and check all wire connections.

Ensuring Safety with Photo Eyes

Wiring photo eyes to a commercial garage door is a task that enhances safety significantly. 

When you follow these steps, you can ensure your garage door operates smoothly and securely. Properly installed photo eyes prevent accidents and protect property, giving you peace of mind.

If you find the process challenging or need professional assistance, Peter and Sons offer expert installation services. 

Their experienced team can handle the wiring and ensure your system is set up correctly. For more information, visit their website at Peter and Sons.

When you learn how to wire photo eyes to a commercial garage door, you not only comply with safety standards but also ensure a safer environment for everyone using the door.

You might like these

Mastering Garage Door Opener Remote Programming

Mastering Garage Door Opener Remote Programming

Mastering Garage Door Opener Remote Programming

Programming your garage door opener remote is a straightforward process that can enhance the convenience and security of your home. Whether you’re setting up a new remote or reprogramming an existing one, understanding the steps involved is crucial. This article provides a detailed guide on garage door opener remote programming, ensuring that your remote functions seamlessly.

Understanding Your Garage Door Opener System

Identify Your Garage Door Opener Type

Before starting the programming process, it’s essential to identify the type of garage door opener you have. Most systems fall into one of the following categories:

  • Standard openers: Operate with a remote control and a wall-mounted button.
  • Smart openers: Can be controlled via a smartphone app in addition to a remote.

Locate the Learn Button

The learn button on your garage door opener is critical for programming the remote. It is usually found on the back or side of the motor unit. It may be labeled as “Learn,” “Program,” or “Set.”

  • Common locations: Typically near the antenna wire or light cover.
  • Color-coded: The button may be red, yellow, green, or purple, depending on the manufacturer.

Steps to Program Your Garage Door Opener Remote

Step 1: Prepare Your Equipment

Gather all the necessary equipment before you begin the programming process. This includes your garage door opener remote, a ladder to reach the motor unit, and your garage door opener manual.

  • Check the remote: Ensure the remote has fresh batteries.
  • Manual reference: Keep the manual handy for specific instructions.

Step 2: Access the Learn Button

To start the programming process, you need to access the learn button on your garage door opener.

  • Use a ladder: Safely position a ladder to reach the motor unit.
  • Locate the button: Identify the learn button based on its color and label.

Step 3: Press the Learn Button

Once you have located the learn button, you need to press it to enter programming mode.

  • Press and release: Press the learn button briefly and release it. The indicator light will turn on, indicating that the unit is ready to program.

Step 4: Program the Remote

With the garage door opener in programming mode, it’s time to program the remote.

  • Press the remote button: Within 30 seconds of pressing the learn button, press and hold the button on your remote control that you wish to program.
  • Watch for confirmation: The opener’s indicator light will blink or turn off, confirming that the remote has been programmed successfully.

Step 5: Test the Remote

After programming, it’s essential to test the remote to ensure it works correctly.

  • Operate the door: Press the remote button to open or close the garage door.
  • Check the range: Test the remote from various distances to ensure it works from your typical approach to the garage.

Troubleshooting Common Issues

Remote Not Working

If the remote does not work after programming, try these troubleshooting steps:

  • Repeat the steps: Go through the programming steps again to ensure accuracy.
  • Check the battery: Replace the remote’s battery with a fresh one.
  • Consult the manual: Refer to your garage door opener’s manual for additional troubleshooting tips.

Interference Issues

Sometimes, interference can affect the remote’s functionality. Here’s how to address it:

  • Remove obstructions: Ensure there are no objects blocking the signal between the remote and the opener.
  • Change the frequency: Some garage door openers allow you to change the operating frequency to avoid interference.

Advanced Programming Features

Multi-Button Remotes

If your remote has multiple buttons, you can program each button to control a different door or function.

  • Repeat programming: Follow the same programming steps for each button, pressing the learn button before each new programming sequence.

Smart Garage Door Openers

For smart garage door openers, you can integrate your remote with smartphone apps for added convenience.

  • Download the app: Install the manufacturer’s app on your smartphone.
  • Follow app instructions: Use the app’s guidelines to sync your remote and smartphone for seamless control.

Conclusion

Properly programming your garage door opener remote ensures reliable and convenient access to your garage. By following these steps, you can easily set up or reprogram your remote. If you encounter any issues or need professional assistance, contact Peter and Sons. Our experienced team is ready to help you with all your garage door needs, ensuring smooth and secure operation of your garage door system. Call us today to schedule a consultation and enhance your garage door experience!

You might like these

Choosing the Right Battery Type for Your Garage Door Opener

Choosing the Right Battery Type for Your Garage Door Opener

Choosing the Right Battery Type for Your Garage Door Opener

When it comes to maintaining the efficiency and reliability of your garage door opener, selecting the correct battery type is crucial. The battery not only powers the opener but also ensures that it functions seamlessly, even during power outages. In this article, we will explore various garage door opener battery types, their benefits, and tips for maintaining them to ensure your garage door operates smoothly.

Understanding Garage Door Opener Batteries

Why Battery Type Matters

Choosing the right garage door opener battery type is essential for:

  • Reliability: Ensures consistent performance.
  • Longevity: Extends the lifespan of the opener.
  • Compatibility: Matches the specific requirements of your garage door opener model.

Common Battery Types

There are several types of batteries used in garage door openers, each with its own set of advantages and applications.

Types of Garage Door Opener Batteries

Alkaline Batteries

Alkaline batteries are commonly used in remote controls for garage door openers.

  • Advantages: Widely available, inexpensive, and reliable for short-term use.
  • Disadvantages: Limited lifespan and frequent replacements needed.

Lithium Batteries

Lithium batteries are known for their long lifespan and reliability.

  • Advantages: Longer-lasting than alkaline batteries, lightweight, and performs well in extreme temperatures.
  • Disadvantages: Higher cost compared to alkaline batteries.

Nickel-Metal Hydride (NiMH) Batteries

NiMH batteries are rechargeable and environmentally friendly.

  • Advantages: Rechargeable, reducing waste and long-term costs; better performance than alkaline in some devices.
  • Disadvantages: Initial cost is higher and requires a charger.

Sealed Lead-Acid (SLA) Batteries

SLA batteries are commonly used for backup power in garage door openers.

  • Advantages: Reliable backup power, long-lasting, and good performance in various temperatures.
  • Disadvantages: Heavier and more expensive than other types; requires proper disposal due to lead content.

Choosing the Right Battery for Your Garage Door Opener

Compatibility

Ensure the battery you choose is compatible with your garage door opener model.

  • Check the manual: Refer to the garage door opener’s manual for recommended battery types.
  • Consult the manufacturer: Contact the manufacturer if unsure about compatibility.

Performance Needs

Consider your specific needs for performance and reliability.

  • Backup power: Choose SLA batteries for reliable backup power.
  • Frequent use: Lithium or NiMH batteries are better for frequent use due to their longer lifespan.

Cost and Longevity

Balance cost and longevity to find the best value.

  • Initial cost vs. long-term savings: While lithium and NiMH batteries have a higher upfront cost, they can save money over time with fewer replacements needed.

Maintenance Tips for Garage Door Opener Batteries

Regular Inspection

Regularly inspect your batteries to ensure they are in good working condition.

  • Check for corrosion: Look for any signs of corrosion on the battery terminals.
  • Test performance: Use a multimeter to check the battery’s charge level.

Proper Storage

Store batteries correctly to extend their lifespan.

  • Cool, dry place: Store batteries in a cool, dry place away from direct sunlight and extreme temperatures.
  • Avoid full discharge: For rechargeable batteries, avoid letting them discharge completely before recharging.

Timely Replacement

Replace batteries as needed to ensure uninterrupted performance.

  • Follow manufacturer guidelines: Adhere to the manufacturer’s recommended replacement schedule.
  • Monitor performance: Replace batteries if you notice a decline in performance or frequent need for recharging.

Benefits of Using the Right Battery

Improved Reliability

Using the correct battery type ensures your garage door opener operates reliably.

  • Consistent performance: Reduces the risk of unexpected failures.
  • Backup power: Ensures the garage door opener works even during power outages.

Enhanced Longevity

Choosing and maintaining the right battery type extends the lifespan of your garage door opener.

  • Fewer replacements: Reduces the frequency of battery replacements.
  • Reduced wear and tear: Minimizes strain on the garage door opener.

Cost Savings

Investing in the right battery type can lead to cost savings over time.

  • Fewer purchases: Long-lasting batteries reduce the need for frequent replacements.
  • Lower maintenance costs: Proper maintenance and battery choice can lower overall maintenance costs.

Conclusion

Selecting the right garage door opener battery type is crucial for ensuring reliable performance and longevity of your garage door system. By understanding the different types of batteries and their benefits, you can make an informed decision that best suits your needs. For professional assistance and expert advice on garage door maintenance, contact Peter and Sons. Our experienced team is ready to help you keep your garage door operating smoothly and efficiently. Call us today to schedule a consultation and ensure your garage door system is always in top condition!

You might like these

Choosing the Right Battery Size for Your Garage Door Opener

Choosing the Right Battery Size for Your Garage Door Opener

Choosing the Right Battery Size for Your Garage Door Opener

Maintaining a functional garage door opener is essential for convenience and security. One critical component that ensures the reliable operation of your garage door opener is the battery. Knowing the correct garage door opener battery size is crucial for keeping your system running smoothly. This article will provide an in-depth look at garage door opener battery sizes, how to choose the right one, and tips for maintaining your opener.

Understanding Garage Door Opener Batteries

Types of Batteries

Garage door openers typically use two main types of batteries:

  • Alkaline batteries: Commonly used in remote controls and keypads.
  • Rechargeable batteries: Used in backup power systems to keep the opener functioning during power outages.

Importance of the Right Battery Size

Using the correct battery size ensures that your garage door opener operates efficiently. An incorrect battery size can lead to poor performance or even damage to the opener.

  • Optimal performance: Ensures the opener functions correctly.
  • Longevity: Helps extend the lifespan of the opener and its components.
  • Safety: Prevents malfunctions that could compromise security.

Identifying Your Garage Door Opener Battery Size

Checking the Manual

The most reliable way to determine the correct battery size is by consulting the owner’s manual for your garage door opener. The manual will specify the recommended battery type and size.

  • Locate the manual: Find the manual that came with your garage door opener.
  • Look for battery specifications: Check the section detailing the battery requirements.

Inspecting the Current Battery

If the manual is not available, you can check the existing battery for size and type information.

  • Remove the battery: Carefully take out the current battery from the opener or remote.
  • Read the label: Look for size, type, and voltage information printed on the battery.

Manufacturer’s Website

Visiting the manufacturer’s website can also provide you with the necessary information about the correct battery size for your garage door opener.

  • Search by model: Enter your garage door opener model number on the manufacturer’s website.
  • Find battery details: Look for battery size and replacement information.

Common Battery Sizes for Garage Door Openers

Remote Controls

Remote controls for garage door openers typically use smaller batteries, such as:

  • AAA batteries: Common in various remote controls.
  • A23 batteries: A smaller, 12-volt battery often used in garage door opener remotes.
  • CR2032 batteries: A coin cell battery used in some modern remotes.

Backup Power Systems

For garage door openers with backup power systems, the battery sizes can vary. Some common types include:

  • 12V 4.5Ah batteries: Often used in backup power units.
  • 12V 7Ah batteries: Another common size for backup power systems, providing longer runtime.

Keypads

Wireless keypads may also require specific battery sizes, such as:

  • 9V batteries: Commonly used in keypads.
  • AAA or AA batteries: Depending on the keypad model.

Replacing Your Garage Door Opener Battery

Steps for Replacement

Replacing the battery in your garage door opener or remote control is a straightforward process. Follow these steps to ensure a successful replacement:

  • Turn off the power: For safety, turn off the power to the garage door opener if replacing a backup battery.
  • Open the battery compartment: Use a screwdriver if necessary to access the battery compartment.
  • Remove the old battery: Take out the old battery and dispose of it properly.
  • Insert the new battery: Place the new battery in the compartment, ensuring correct polarity.
  • Close the compartment: Secure the battery compartment and restore power if applicable.

Testing the New Battery

After replacing the battery, test the garage door opener to ensure it is functioning correctly.

  • Test the remote: Press the buttons to verify the opener responds.
  • Check the opener: Open and close the garage door to confirm proper operation.

Maintenance Tips for Garage Door Opener Batteries

Regular Checks

Perform regular checks on your garage door opener batteries to ensure they are in good condition.

  • Monthly inspections: Check the battery for corrosion or leaks.
  • Replace as needed: Change the battery if it shows signs of wear or damage.

Keep Spares Handy

Having spare batteries on hand can prevent downtime if a battery fails.

  • Stock up: Keep extra batteries of the correct size in your home.
  • Rotate stock: Use older batteries first to ensure freshness.

Conclusion

Understanding and selecting the correct garage door opener battery size is essential for maintaining smooth and reliable operation. By consulting your manual, inspecting your current battery, and following the manufacturer’s recommendations, you can ensure optimal performance and longevity of your garage door opener. For professional assistance with garage door maintenance and battery replacement, contact Peter and Sons. Our experienced team is ready to help with all your garage door needs. Call us today to schedule an appointment and keep your garage door system running smoothly!


You might like these

Easy Guide to Garage Door Opener Battery Change

Easy Guide to Garage Door Opener Battery Change

Top Signs Your Commercial Garage Door Rollers Need Replacement

Maintaining a functional garage door opener is crucial for home security and convenience. One essential aspect of this maintenance is regularly performing a garage door opener battery change. This simple yet vital task ensures that your garage door operates smoothly without interruptions. In this guide, we’ll walk you through the process of changing the battery in your garage door opener, from identifying the signs of a low battery to completing the replacement.

Recognizing the Need for a Battery Change

Signs of a Weak Battery

Identifying when it’s time to change your garage door opener battery is essential for uninterrupted operation. Common signs that indicate a weak or dying battery include:

  • Decreased remote range: The remote only works when you are very close to the garage door.
  • Intermittent operation: The door sometimes fails to open or close.
  • Slow response time: Delayed reaction when pressing the remote buttons.

Benefits of Timely Battery Replacement

Changing the battery in your garage door opener at the right time can offer several benefits:

  • Enhanced performance: Ensures the door operates smoothly and efficiently.
  • Increased security: Prevents unauthorized access due to a malfunctioning opener.
  • Convenience: Avoids the hassle of being locked out or having to manually operate the door.

Preparing for the Battery Change

Gather Necessary Tools and Materials

Before starting the battery change process, gather the following tools and materials:

  • New battery: Ensure it matches the specifications required by your garage door opener.
  • Small screwdriver: Typically needed to open the battery compartment.
  • Clean cloth: For cleaning the battery contacts if necessary.

Safety Precautions

Taking proper safety precautions is crucial when performing a garage door opener battery change:

  • Disconnect power: For added safety, unplug the garage door opener or turn off the circuit breaker.
  • Work in a well-lit area: Ensures you can see clearly and avoid accidents.

Step-by-Step Guide to Changing the Battery

Step 1: Locate the Battery Compartment

Start by finding the battery compartment on your garage door opener remote or wall unit:

  • Check the manual: Refer to the user manual for the exact location of the battery compartment.
  • Common locations: Typically found on the back of the remote or behind a small panel on the wall unit.

Step 2: Open the Battery Compartment

Next, open the battery compartment to access the old battery:

  • Use a screwdriver: If the compartment is secured with screws, use a small screwdriver to remove them.
  • Slide open: For compartments with a sliding cover, gently slide it open.

Step 3: Remove the Old Battery

Carefully remove the old battery from the compartment:

  • Lift out the battery: Use your fingers or a small tool to lift the battery out.
  • Check for corrosion: Inspect the battery contacts for any corrosion and clean them with a cloth if needed.

Step 4: Insert the New Battery

Insert the new battery into the compartment, ensuring correct orientation:

  • Match polarity: Align the positive and negative ends of the battery with the markings in the compartment.
  • Secure the battery: Ensure the battery fits snugly and makes proper contact with the terminals.

Step 5: Close the Battery Compartment

After inserting the new battery, close the battery compartment securely:

  • Replace screws: If applicable, reattach any screws to secure the compartment cover.
  • Slide cover: Slide the cover back into place if it has a sliding mechanism.

Testing the Garage Door Opener

Verify Proper Operation

Test the garage door opener to ensure the new battery is working correctly:

  • Press the remote button: Check if the door responds promptly to the remote control.
  • Test range: Verify that the remote works from a reasonable distance.

Troubleshooting Common Issues

If the garage door opener does not function properly after changing the battery, consider these troubleshooting steps:

  • Check battery orientation: Ensure the battery is installed correctly with the right polarity.
  • Inspect contacts: Clean any corrosion or dirt from the battery contacts.
  • Consult the manual: Refer to the user manual for additional troubleshooting tips.

Regular Maintenance Tips

Routine Battery Checks

Perform routine checks to ensure your garage door opener remains in good working condition:

  • Annual replacement: Change the battery at least once a year, even if it seems to be working fine.
  • Keep spares: Always have a spare battery on hand to avoid inconvenience.

General Maintenance

In addition to battery changes, regular maintenance of your garage door opener includes:

  • Lubricate moving parts: Apply lubricant to the door tracks, rollers, and hinges to ensure smooth operation.
  • Inspect the system: Regularly check for signs of wear and tear on the opener and door components.

Keep Your Garage Door in Top Shape

Regular maintenance, including timely battery changes, is crucial for the efficient operation of your garage door opener. By following this guide on how to perform a garage door opener battery change, you can ensure your garage door operates smoothly and reliably. For professional assistance and comprehensive garage door services, contact Peter and Sons. Our experienced team is ready to help you with all your garage door needs. Call us today to schedule an appointment and keep your garage door in top condition!

You might like these

sabung ayam online

sv388

sbobet88

casino online

scatter hitam

server thailand

mikitoto

pintuplay

slot thailand

slot server thailand

slot777

garuda69

sbobet88

sv388

togel hongkong

mahjong ways 2

Mahjong ways 2

sv388

casino online

BESTTOGEL

BESTTOGEL

scatter hitam

casino online

sabung ayam online

judi bola online

live casino online

mahjong ways

hk pools

SABUNG AYAM ONLINE

SLOT MAHJONG

APK SLOT

SLOT MAXWIN

visitorbet

i8live

i8live

sbobet88

judi basket

sabung ayam online

slot mahjong

mahjong slot

slot777

slot mahjong

sabung ayam online

judi bola online

live casino online

judi bola

sabung ayam online

slot mahjong

Mahjong Ways 2 Mendadak Gacor ! Pola Scatter Cepat Ini Lagi Ramai Dipakai

baristabogota.com

buffetbogota.com

cateringeventos.com

cattleyaeventos.com

cocoaeventos.com

coctelesyeventos.com

daiquiricocktailbar.com

elgranbartender.com

elianahernandez.com.co

escortsenbogota.com

fiestadematrimonio.com

fiestasdematrimonio.com

gigolosenbogota.com

grupoempresarialbaen.com

justmarried.com.co

limopartybogota.com

luxuryeventos.com.co

panelaorganica.com.co

pijamasbogota.com

sexshopcolombia.com.co

sextourbogota.com

showsbogota.com

siluetasytonos.com

simondice.com.co

sipirili.com.co

stripperbogota.com

swingerpartybogota.com

uniformesbogota.com

weddingcolombia.com.co

xn--fiestasde15aos-1nb.com

centro-occidente.coneicc.org.mx

mancomunidad.org

ccfdchildcare.com

www.sasrourissol.fr

www.loucaloun.fr

luxuryeventos.com.co

biopreventative.com

www.beton-cire-13.fr

qhiresolutions.com

cptrekking.com.br

bullandbeartravels.co.tz

cattleyaeventos.com

ablaw.vn

www.mishofamarwah.sch.id

grupoempresarialbaen.com

sherleyskin.com

www.adnmart.com

algnutrastore.com

anigeouscosmetics.com

aqua-dotterel-346593.hostingersite.com

bariahouselifting.com

blazeremedies.in

friendspackermovers.com

gravityprints.com

herbalpowerindia.com

homeheartindia.com

kalanishtha.com

kanhapolyfab.com

muzaffarpurgaushala.org

myratrendz.com

northpackindia.com

orchiddecorcrafts.com

orientaltrimex.com

rainurail.com

royalblue-antelope-713279.hostingersite.com

sharprintech.com

thathardwarestore.com

xtronindia.com